How to Set Up ADFS SSO
Configure SSO between Helpjuice and your ADFS server for secure and seamless user authentication

Written by Diego Selzlein
Updated at May 29th, 2026, by Amanda Stançani
Table of Contents
Helpjuice supports ADFS SSO, allowing organizations to integrate their Active Directory Federation Services for centralized authentication. By configuring ADFS SSO, users can log in securely with their existing AD credentials, simplifying access management and improving security.
In this article, you’ll learn:
- How to configure ADFS SSO in Helpjuice
- How to set up the necessary claims and attributes
- How users can sign in using ADFS
- Common troubleshooting tips
Step 1: Configuring Helpjuice as a Trusted Relying Party
To set up Helpjuice as a trusted relying party on your ADFS server, you can either use Helpjuice’s XML Metadata or follow ADFS’s step-by-step wizard.
XML Metadata:
If you'd prefer to use XML Metadata for your configuration, you can copy and paste the following code:
<?xml version="1.0" encoding="utf-8"?>
<EntityDescriptor ID="_271f377f-78d8-4133-8c46-a73c4936bb1f" entityID="https://helpjuice.com" xmlns="urn:oasis:names:tc:SAML:2.0:metadata">
  <RoleDescriptor xsi:type="fed:ApplicationServiceType" xmlns:fed="http://docs.oasis-open.org/wsfed/federation/200706" protocolSupportEnumeration="http://docs.oasis-open.org/wsfed/federation/200706" xmlns:xsi="http://www.w3.org/2001/XMLSchema-instance">
    <fed:TargetScopes>
      <wsa:EndpointReference xmlns:wsa="http://www.w3.org/2005/08/addressing">
        <wsa:Address>https://helpjuice.com/</wsa:Address>
      </wsa:EndpointReference>
    </fed:TargetScopes>
    <fed:PassiveRequestorEndpoint>
      <wsa:EndpointReference xmlns:wsa="http://www.w3.org/2005/08/addressing">
        <wsa:Address>https://helpjuice.com/</wsa:Address>
      </wsa:EndpointReference>
    </fed:PassiveRequestorEndpoint>
  </RoleDescriptor>
</EntityDescriptor>
Alternatively, if you prefer, you can configure the connection manually using ADFS’s built-in wizard.
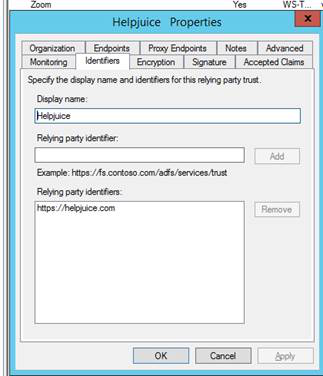
Step 2: Configuring Relying Party Identifiers
In the Relying Party Identifiers tab, you’ll need to configure identifiers to recognize Helpjuice. This ensures your ADFS server knows to trust Helpjuice as a secure application.
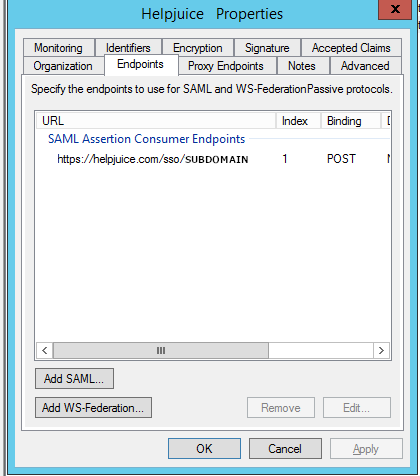
Step 3: Configuring Endpoints
Assertion Consumer Service (ACS) URL: In the Endpoints tab, you must add the Assertion Consumer Endpoint URL to route ADFS login requests to Helpjuice. This URL will look like:
https://your-subdomain.helpjuice.com/sso/If you’re using a CNAME (e.g., support.mycompany.com), you'll need to add that specific CNAME endpoint to the list.
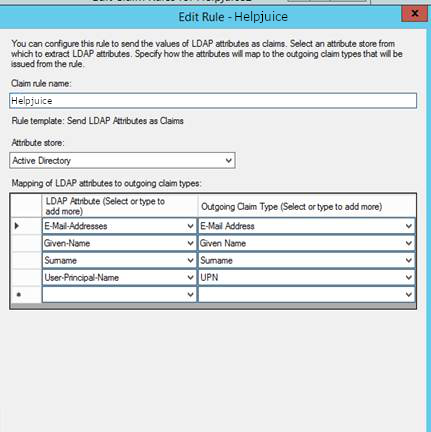
Step 4: Configuring the Attribute Rule
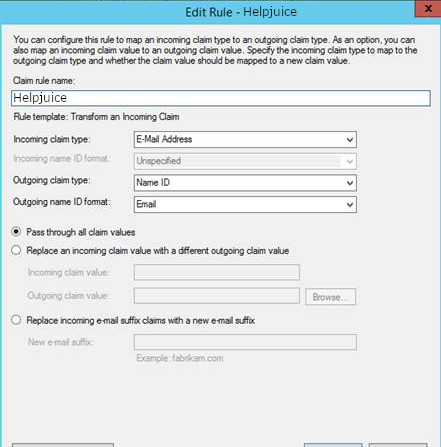
A critical part of the configuration is creating the right Claim Rule to send attributes from your Active Directory to Helpjuice. This rule must include the user's email address in the nameID field, which Helpjuice will use for user authentication.
If it’s not possible to send the email in the nameID field in your environment, you can send it in another attribute field and update the SSO Email Field under Helpjuice Settings > SAML.
Step 5: Updating Helpjuice SSO Settings
Now that ADFS is configured, you’ll need to update your Helpjuice SSO settings to finalize the integration.
Navigate to Helpjuice Settings > SSO (SAML):
- Identity Provider URL: The URL from your ADFS server.
- SHA1 Fingerprint: Use a tool like SAMLTool to generate the SHA1 fingerprint from your ADFS certificate.
- Issuer: This will be Helpjuice's URL (https://helpjuice.com)
- Authn Context: Leave this field blank for ADFS.
Best Practices
- Test ADFS login with a few users before rolling it out organization-wide.
- Keep your ADFS certificate up to date to prevent authentication failures.
- Review claim rules periodically to ensure they match your current user attributes.
- Adjust default user permissions in Helpjuice as needed to maintain secure access.