How To Switch Languages On The Front End
Learn how to easily switch between languages on the front end of your Knowledge Base

Written by Denis Omerovic
Updated on September 22nd, 2025, by Amanda Stançani
Table of Contents
This article explains how to include a language switcher in your Helpjuice knowledge base so users can toggle between languages. You’ll learn:
- What a language switcher is and why it matters
- How the default and custom designs work
- Step-by-step instructions to add the switcher (HTML, CSS, JS)
- Optional extras like using flags and custom appearance
Key Concepts
- Language Switcher: A UI component that lets users select their preferred language from among those enabled in the KB.
- Default Design: The pre-built version Helpjuice provides, showing language codes and flags.
- Custom Design: A version you can style and modify using your own code (HTML/CSS/JS) for branding or layout preferences.
Designs and Features
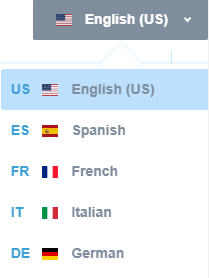
Default Design
- Displays both the language code (e.g. “EN”, “ES”) and the flag icon associated with the language.
- Clear, intuitive look so users can recognize languages easily.
Custom Design
If you need a more tailored appearance for the Language Switcher, you can customize the design via code in your Customize Area. This allows you to adjust the look and feel according to your branding needs.
If you'd rather have us handle the customization for you, feel free to submit a customization request, and we’ll make the changes to fit your preferences!.
How to Add the Language Switcher
Simply go to your_subomain.helpjuice.com/admin/customize/main_layout and follow the steps below:
Step 1: Add HTML to Main Layout
Go to your Helpjuice account at your_subdomain.helpjuice.com/admin/customize/main_layout and paste the following HTML snippet somewhere in the <header> (or wherever you want the switcher to appear):
{% if account.languages.size > 1 %}
    <div class="hj-language-switcher desktop">
        <div class="current-language">
            <span class="flag-icon flag-icon-{{ current_language.shortcode | slice: 3, 5 | downcase }}"></span>
            <span class="language-name">{{ current_language.name }}</span>
        </div>
        {% if on_show_question_page %}
            <div class="languages">
                {% for language in account.languages %}
                    {% if translation_codes contains language.shortcode %}
                        <div>
                            <a href="/{{ language.shortcode }}{{question.url}}" class="{% if language.name == current_language.name %}current{% endif %}">
                                <span class="language-code">{{ language.shortcode | slice: 3, 5 | upcase }}</span>
                                <span class="flag-icon flag-icon-{{ language.shortcode | slice: 3, 5 | downcase }}"></span>
                                <span class="language-name">{{ language.name }}</span>
                            </a>
                        </div>
                    {% else %}
                        <div>
                            <a href="/{{ language.shortcode }}" class="{% if language.name == current_language.name %}current{% endif %}">
                                <span class="language-code">{{ language.shortcode | slice: 3, 5 | upcase }}</span>
                                <span class="flag-icon flag-icon-{{ language.shortcode | slice: 3, 5 | downcase }}"></span>
                                <span class="language-name">{{ language.name }}</span>
                            </a>
                        </div>
                    {% endif %}
                {% endfor %}
            </div>
        {% elsif on_contact_us_page %}
            <div class="languages">
                {% for language in account.languages %}
                    <div>
                        <a href="/{{ language.shortcode }}/contact-us" class="{% if language.name == current_language.name %}current{% endif %}">
                            <span class="language-code">{{ language.shortcode | slice: 3, 5 | upcase }}</span>
                            <span class="flag-icon flag-icon-{{ language.shortcode | slice: 3, 5 | downcase }}"></span>
                            <span class="language-name">{{ language.name }}</span>
                        </a>
                    </div>
                {% endfor %}
            </div>
        {% elsif thanks %}
            <div class="languages">
                {% for language in account.languages %}
                    <div>
                        <a href="/{{ language.shortcode }}/thanks" class="{% if language.name == current_language.name %}current{% endif %}">
                            <span class="language-code">{{ language.shortcode | slice: 3, 5 | upcase }}</span>
                            <span class="flag-icon flag-icon-{{ language.shortcode | slice: 3, 5 | downcase }}"></span>
                            <span class="language-name">{{ language.name }}</span>
                        </a>
                    </div>
                {% endfor %}
            </div>
        {% elsif author %}
            <div class="languages">
                {% for language in account.languages %}
                    <div>
                        <a href="/{{ language.shortcode }}/authors/{{ author.id }}" class="{% if language.name == current_language.name %}current{% endif %}">
                            <span class="language-code">{{ language.shortcode | slice: 3, 5 | upcase }}</span>
                            <span class="flag-icon flag-icon-{{ language.shortcode | slice: 3, 5 | downcase }}"></span>
                            <span class="language-name">{{ language.name }}</span>
                        </a>
                    </div>
                {% endfor %}
            </div>
        {% else %}
            <div class="languages">
                {% for language in account.languages %}
                    <div>
                        <a href="/{{ language.shortcode }}" class="{% if language.name == current_language.name %}current{% endif %}">
                            <span class="language-code">{{ language.shortcode | slice: 3, 5 | upcase }}</span>
                            <span class="flag-icon flag-icon-{{ language.shortcode | slice: 3, 5 | downcase }}"></span>
                            <span class="language-name">{{ language.name }}</span>
                        </a>
                    </div>
                {% endfor %}
            </div>
        {% endif %}
    </div>
{% endif %}
Step 2: Add CSS Styling
Go to your_subdomain.helpjuice.com/admin/customize/main_css and paste the following CSS to style the switcher:
.hj-language-switcher {
    display: inline-block;
    position: relative;
    margin-left: 10px;
    .current-language {
        position: relative;
        display: inline-flex;
        justify-content: space-between;
        align-items: center;
        padding: 10px 30px 10px 20px;
        background: #7f8d9c;
        border-radius: 2px;
        cursor: pointer;
        .flag-icon {
            margin-right: 10px;
            background-size: 16px;
        }
        .language-name {
            font-size: 14px;
            font-weight: 600;
            color: #FFFFFF;
        }
        &::after {
            content: '';
            width: 5px;
            height: 5px;
            border-top: 2px solid #FFFFFF;
            border-right: 2px solid #FFFFFF;
            position: absolute;
            right: 10px;
            top: 13px;
            transform: rotate(135deg);
            -webkit-transform: rotate(135deg);
            z-index: 999;
        }
    }
    .languages {
        position: absolute;
        display: none;
        margin: 0;
        padding: 5px;
        top: 65px;
        left: calc(50% - 125px);
        z-index: 9999;
        background: #FFFFFF;
        box-shadow: 0 0 5px rgba(87, 187, 255, .25);
        -webkit-box-shadow: 0 0 5px rgba(87, 187, 255, .25);
        border-radius: 5px;
        min-width: 250px;
        &.active {
            display: block;
        }
        &::before {
            content: '';
            width: 30px;
            height: 30px;
            background: #FFFFFF;
            transform: rotate(45deg);
            -webkit-transform: rotate(45deg);
            position: absolute;
            left: calc(50% - 15px);
            margin-top: -19px;
            z-index: -1;
            box-shadow: 0 0 5px rgba(87, 187, 255, .25);
            -webkit-box-shadow: 0 0 5px rgba(87, 187, 255, .25);
        }
        a {
            display: inline-flex;
            justify-content: flex-start;
            align-items: center;
            margin: 0;
            font-size: 14px;
            font-weight: 600;
            color: #7f8d9c;
            text-decoration: none;
            background: #FFFFFF;
            cursor: pointer;
            width: 100%;
            padding: 10px;
            border-radius: 3px;
            &.current {
                background: darken(aliceblue, 10%);
            }
            &:hover {
                text-decoration: none!important;
                background: darken(aliceblue, 10%);
            }
            .language-code {
                width: 30px;
                font-weight: bold;
            }
            .flag-icon {
                margin-right: 12px;
                background-size: 16px;
            }
            .language-name {
                font-size: 14px;
                font-weight: 600;
                color: #7f8d9c;
            }
        }
    }
    &.mobile {
        display: inline-flex;
        width: 100%;
        @media (min-width: 1024px) {
            display: none;
        }
        margin: 0 0 10px 0;
        .current-language {
            margin-left: auto;
            .flag-icon {
                margin: 0;
            }
        }
        .languages {
            top: 40px;
            left: inherit;
            right: 0;
            &::before {
                content: none;
            }
        }
    }
    &.desktop {
        @media (max-width: 1023px) {
            display: none;
        }
    }
}
Step 3: Add JavaScript for Functionality
Go to your_subdomain.helpjuice.com/admin/customize/main_js and paste this JS to enable showing/hiding the language list:
$('.hj-language-switcher .current-language').on('click', function() {
    $(this).parent().find('.languages').toggleClass('active');
});


$(document).click(function(e) {
    var switcher = $('.hj-language-switcher');
    if (!switcher.is(e.target) && switcher.has(e.target).length === 0) {
        $('.hj-language-switcher .languages').removeClass('active');
    };
});
Step 4 – Optional: Include Country Flags
If you want flag icons to show up properly, add the following <link> tag in the <head> of your layout:
<link rel="stylesheet" href="https://cdnjs.cloudflare.com/ajax/libs/flag-icon-css/3.5.0/css/flag-icon.min.css">Troubleshooting
- Switcher doesn’t appear: Ensure you have more than one language enabled in your account. The HTML snippet wraps in if account.languages.size > 1.
- Styles not applying: Confirm that you pasted CSS into the correct file (main_css) and that there are no conflicting styles elsewhere.
- Flags not showing: Make sure you've included the flag icon CSS link (Step 4 optional) and that the flag-icon CSS library is accessible.
- Language links broken or wrong: Check that the link paths match your KB’s URL structure (with or without question.url, or contact us, etc.).
Best Practices
- Keep the switcher visible and intuitive; language toggle should be easy to find.
- Use consistent styling with your brand (colors, typography).
- Test on both desktop and mobile to ensure usability.
- If you customize heavily, maintain documentation of your custom code for future updates.
Need Help?
If you don't feel comfortable changing the code, we will be happy to update it for you! Simply submit a new customization request and our team will make any necessary changes!