How to Set Up SSO with Azure AD
Connect your Azure Active Directory account with Helpjuice for Single Sign-On

Written by Diego Selzlein
Updated on May 29th, 2026, by Amanda Stançani
Table of Contents
Helpjuice allows you to authenticate your users via Azure Active Directory (Azure AD) using SAML 2.0. Integrating Azure AD with Helpjuice makes access management more secure and simplifies login for your team. Follow the steps outlined in this Azure AD SAML Toolkit Tutorial to enable SSO in your Azure account.
In this article, you’ll learn:
- How to set up SSO using Azure AD.
- How to configure Helpjuice for Azure AD.
- How to test and verify your SSO configuration.
- Best practices for managing users and permissions.
Step 1: Configure Azure AD for Helpjuice
- Log in to the Azure AD Admin Center.
- Navigate to Enterprise Applications > New Application.
- Click Create your own application and give it a name (e.g., “Helpjuice”).
- Select Integrate any other application you don’t find in the gallery (Non-gallery), then click Create.
Configure Single Sign-On in Azure AD
- Go to the Single Sign-On section in your new app.
- Select SAML as the sign-on method.
- In Basic SAML Configuration, enter the following:
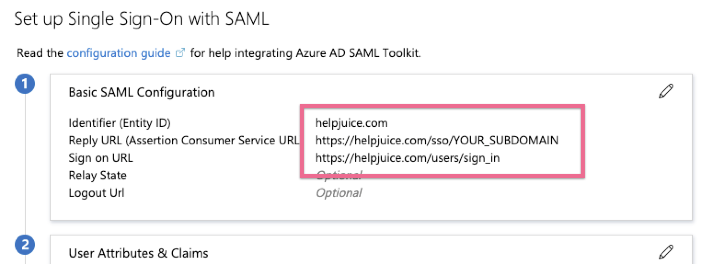
Replace your_subdomain with your actual Helpjuice subdomain. For example, if your knowledge base URL is https://help.helpjuice.com, your subdomain is help.
Step 2: Configure User Attributes & Claims
In the User Attributes & Claims section, ensure the following attributes are mapped:
- email → user’s email
- firstName → given name
- lastName → surname
Step 3: Configure Helpjuice
After completing the configuration in Azure AD, navigate to Helpjuice Settings > SSO (SAML) and input the details provided by your Azure AD SAML Toolkit, as shown below:
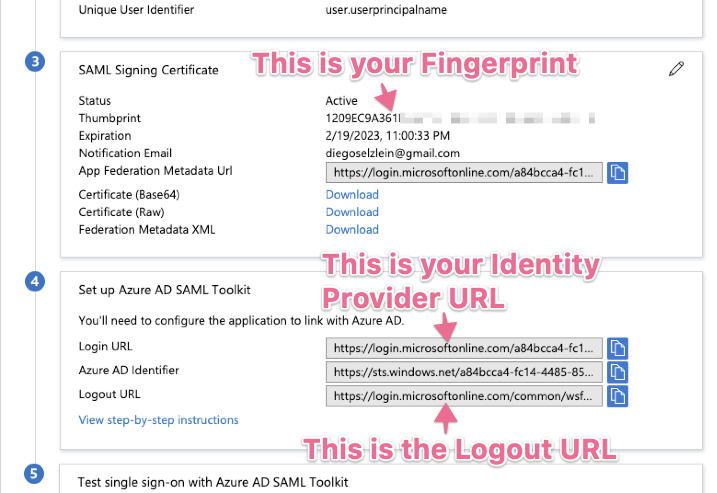
Fill in the corresponding fields in Helpjuice using the information from Azure AD. Your Helpjuice configuration should look like this:

Additional SAML Settings
At the bottom of the Helpjuice SSO settings page, you will need to:
- Set
helpjuice.comas the Issuer. - Select
<blank>in the Authn Context field.

Once you’ve completed these steps, your SSO authentication should be fully operational.
Updating Azure Active Directory SSO Configuration
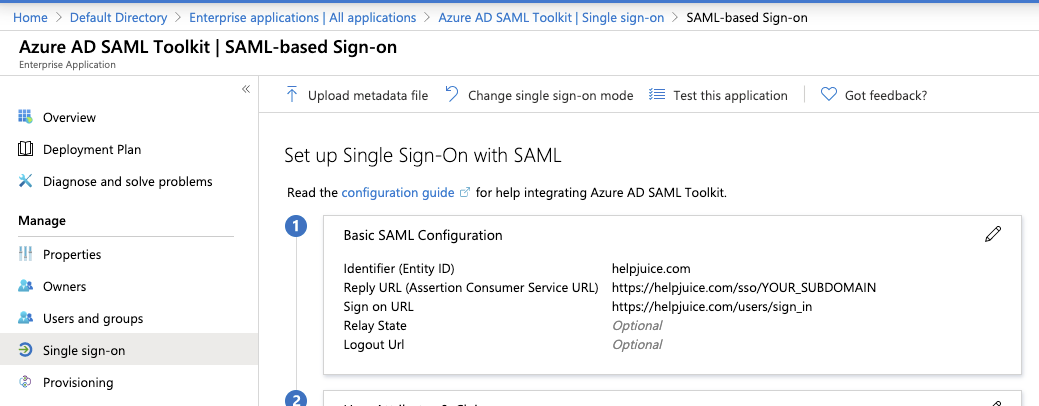
If you ever need to update your configuration on the Identity Provider side (Azure AD), follow this path:
- Azure Portal > Azure Active Directory > Enterprise Applications > Azure AD SAML Toolkit > Single sign-on (left menu)
This will take you to the SSO configuration page:
To update your configuration, simply click the pencil icon next to the field you wish to modify.
Troubleshooting Issues
See Single Sign-On Authentication for error messages and how to resolve them.
Best Practices
- Test SSO integration with a small group of users before rolling it out to the entire organization.
- Keep a copy of your Azure AD metadata in case you need to reconfigure SSO.
- Ensure all users exist in both Azure AD and Helpjuice to avoid login issues.
- Map required attributes carefully to avoid authentication errors.